Indulging in a decadent dessert doesn’t always have to involve hours of baking and meticulous kitchen work. Enter the No-Bake Buckeye Cheesecake Bars – a heavenly combination of rich cream cheese, velvety peanut butter, and a chocolatey crust that’ll make your taste buds dance. In this blog post, we’ll guide you through a step-by-step journey to creating these delectable treats. With a simple list of ingredients and straightforward instructions, you’ll be whipping up these bars in no time, earning yourself a well-deserved pat on the back for your culinary prowess.
Crafting the Perfect Crust
The foundation of any exceptional dessert lies in its crust, and the No-Bake Buckeye Cheesecake Bars are no exception. Begin by crushing about 22 Oreos into fine crumbs – the sweet aroma wafting through the air is a prelude to the deliciousness to come. Mix these chocolatey bits with 6 tablespoons of melted unsalted butter until the crumbs are thoroughly coated. Press this heavenly mixture into a parchment-lined 9″x9″ pan, creating a firm and even layer that will serve as the delectable base for our cheesecake bars. Pop it into the refrigerator, and you’re ready to move on to the heart of this delightful dessert.

Creating the Creamy Cheesecake Center
The soul of our No-Bake Buckeye Cheesecake Bars lies in the luscious cream cheese and peanut butter concoction that crowns the chocolatey crust. In a large bowl, whip together two blocks of softened cream cheese and a cup of creamy peanut butter until the mixture achieves a velvety smoothness. The addition of confectioners’ sugar and a dash of pure vanilla extract transforms this blend into a sweet symphony of flavors. Spoon this creamy goodness over the prepared crust, ensuring an even distribution. With the foundation laid, let the cheesecake layer chill in the refrigerator for at least 2 hours, allowing the flavors to meld into perfection. For an even more indulgent experience, consider letting it set overnight – patience truly does reward the palate.

Chocolatey Finale – Topping it Off
What’s a Buckeye without its chocolatey finish? The crowning glory of our No-Bake Buckeye Cheesecake Bars comes in the form of a semisweet chocolate chip topping. Melt 3/4 cup of these luscious chips in short increments, stirring between each until a smooth and glossy texture is achieved. Work quickly to spread this chocolatey goodness over the chilled cheesecake layer, ensuring an even coat. The result is a harmonious blend of rich chocolate and creamy peanut butter, a flavor profile that’s bound to impress even the most discerning dessert enthusiasts. Allow the chocolate to set in the refrigerator for about 30 minutes, and you’ll soon be ready to unveil your masterpiece.
Serving Up Delight – Cutting and Presenting
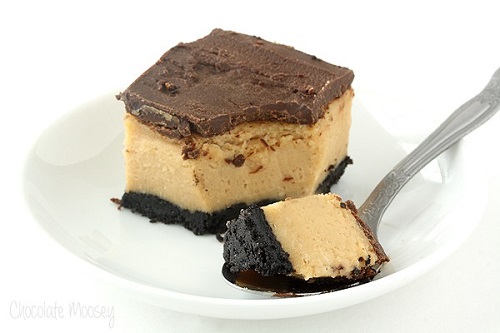
With the final touches in place, it’s time to unveil your No-Bake Buckeye Cheesecake Bars. Using the parchment paper overhang, gently lift the chilled creation from the pan. Place it on a clean surface, and with a sharp knife, cut the bars into squares of your desired size. The anticipation builds as you reveal the layers – the chocolatey crust, the creamy cheesecake, and the glossy chocolate topping. Arrange them on a serving platter, and you’re ready to treat your friends, family, or simply yourself to a slice of pure bliss.

Mastering the art of creating No-Bake Buckeye Cheesecake Bars is a delightful journey that culminates in a symphony of flavors and textures. With a simple yet decadent combination of ingredients and easy-to-follow steps, these bars are a testament to the joy of no-fuss desserts. Whether you’re a seasoned baker or a kitchen novice, these bars are sure to become a staple in your repertoire. Treat yourself to the pleasure of savoring each layer, and revel in the satisfaction of creating a dessert that’s as impressive as it is delicious.